I want to start with something nobody usually says in these articles: most adults who want to improve their handwriting already know that they should practise — they just don't know how. They've read the vague advice ("write more slowly," "hold the pen looser") and found that it didn't actually stick. The handwriting improved for one afternoon and then went straight back to its old ways the following morning.
That's not a willpower problem. It's a method problem.
Handwriting is a physical skill, not just a knowledge skill. You can read every tip in the world and your hand won't move any differently until it has actually practised those movements enough times for them to become automatic. This guide is built around that reality. It's designed for adults — specifically — not children, not teenagers, not calligraphy enthusiasts building a new skill from zero, but adults who already write a certain way and want to change it.
That's harder than starting fresh. But it's very much possible, and this guide will walk you through exactly how.
- Why Adult Handwriting Deteriorates (And What That Means for Fixing It)
- Step 1 — Do an Honest Assessment of Your Handwriting
- Step 2 — Fix Your Grip and Sitting Position First
- Step 3 — Choose the Right Tools
- Step 4 — Start With Stroke Drills, Not Letters
- Step 5 — Targeted Letter Practice for Your Weak Spots
- Step 6 — Sentence Practice That Actually Builds Muscle Memory
- Your 7-Day Weekly Practice Schedule
- The 6 Most Common Mistakes Adults Make When Practising
- Print vs Cursive — Which Should Adults Focus On?
- What to Expect: A Realistic Progress Timeline
- Frequently Asked Questions
Why Adult Handwriting Deteriorates (And What That Means for Fixing It)
Here's something that surprises most people: your handwriting didn't actually get worse. What happened is that your typing got much, much better — and that relative shift made your handwriting feel inadequate by comparison. The motor pathway that controls handwriting hasn't gone anywhere. It's just been deprioritised.
Think about how often you actually write by hand as an adult. A shopping list here, a birthday card there, the occasional note in a meeting. Most adults write by hand for less than ten minutes a day, down from potentially hours in school. Motor skills that aren't used regularly don't disappear, but they do become less precise, less fluid, and less automatic. The path is still there — it's just overgrown.
The second factor is habits that were never corrected. Most of us developed our handwriting in school under mild time pressure — copying from a board, writing in exams, keeping up with a teacher dictating notes. Speed was rewarded implicitly. Neatness was a secondary concern. And any bad habits we formed then — a cramped grip, letters that lean inconsistently, words spaced unevenly — got baked in through thousands of hours of repetition. They feel completely natural now, even though they're wrong.
Understanding both of these things matters because it changes how you approach improvement. You're not learning something new — you're re-learning something you once knew at a different standard, and breaking habits that have been reinforced for decades. That requires patience and a method that's different from what works for a seven-year-old picking up a pencil for the first time.
Your handwriting motor memory is like a path through a field that hasn't been walked in years. The path is still there, but it's overgrown. Your job isn't to build a new path — it's to clear and widen the old one. That's faster, but it requires deliberately choosing the right path each time, not just walking wherever feels natural.
Step 1 — Do an Honest Assessment of Your Handwriting
Before you change anything, you need to understand what's actually wrong. Most people jump straight to practising, which means they practise their existing mistakes — and get better at their mistakes. Spend ten minutes on this assessment first. It will make every subsequent session more targeted and more effective.
The Assessment Process
Sit down with a piece of lined paper and write the following paragraph at your normal handwriting speed — not your "trying to be neat" speed. Your actual everyday writing speed. Here it is:
Now photograph it or hold it at arm's length. Assess it against these five criteria:
Write down your findings. Specifically, name your top three problems in order. These will be your focus throughout the first two weeks. Trying to fix everything simultaneously is a reliable way to fix nothing.
The majority of adults who do this exercise discover that their biggest problem is letter height inconsistency — specifically that their ascenders (the tall parts of letters like h, l, b) aren't all the same height. This is good news: it's one of the easiest problems to fix with targeted practice, and fixing it dramatically improves the overall appearance of your handwriting almost immediately.
Step 2 — Fix Your Grip and Sitting Position First
I know. You've been holding a pen your whole life and you resent being told you're doing it wrong. Bear with me, because grip is the root cause of more handwriting problems than any other single factor — and most adults are gripping their pens far too tightly without realising it.
The Correct Grip — The Tripod Hold
Rest the pen between the tip of your thumb and the side of your index finger. Your middle finger should sit underneath, forming the third point of a triangle. The pen should rest in the hollow between your thumb and index finger. Hold it about 2.5 to 3 centimetres from the tip — far enough that you can see what you're writing, close enough for control.
Now: loosen your grip. Seriously. The pen should be able to be pulled out of your hand with a very light tug. Most adults grip a pen as though it might escape if they relax for a second. That tension travels up into your wrist, forearm, and shoulder — and it is the primary reason adult handwriting becomes cramped, slow, and uneven under sustained writing.
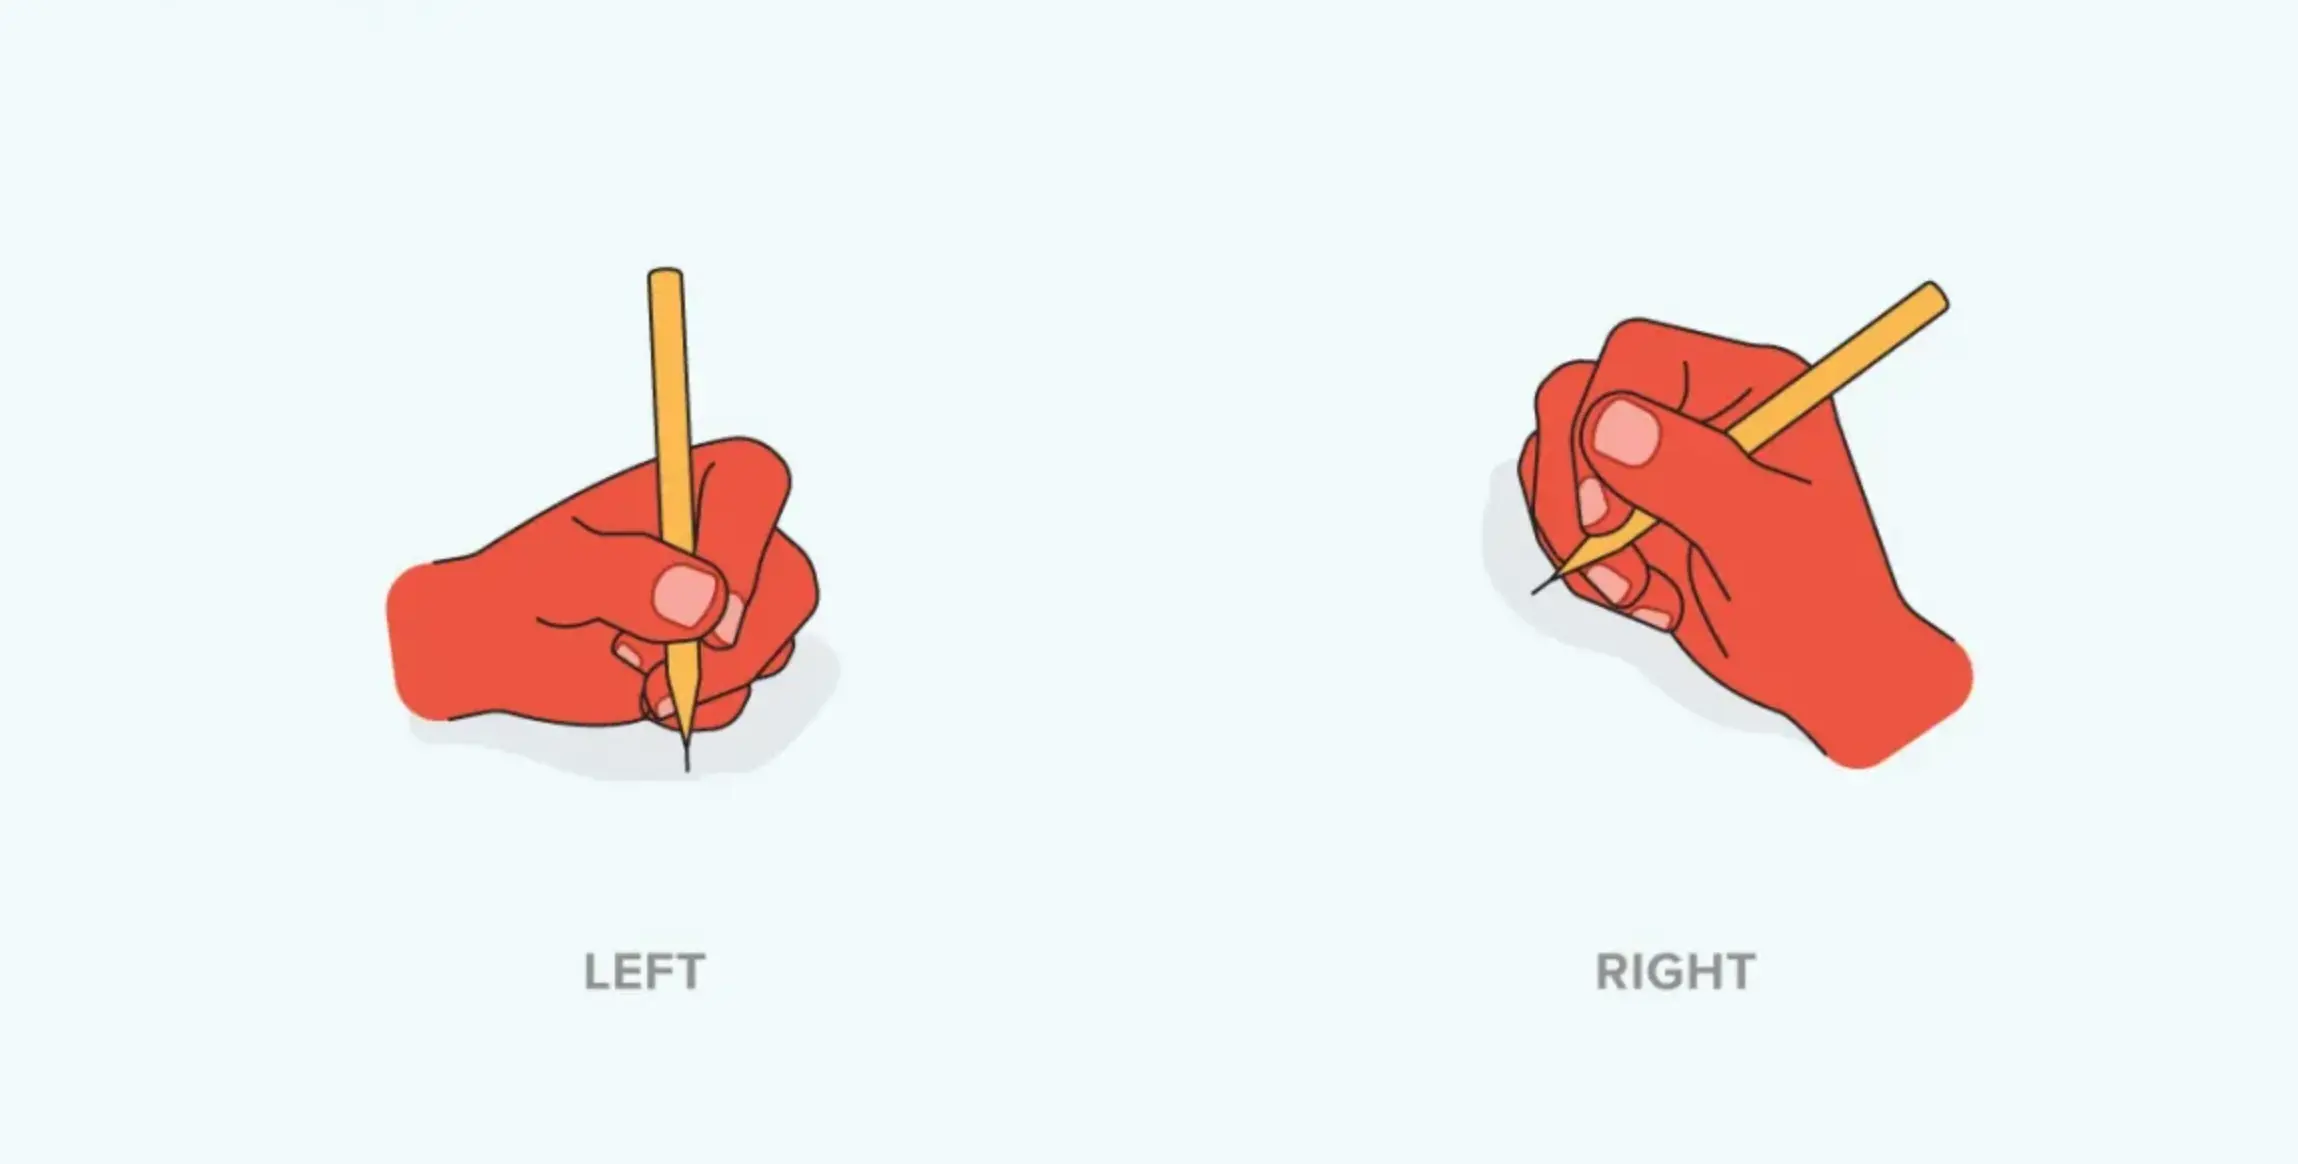
The tripod grip — thumb, index, and middle finger — is the standard recommendation for efficient, fatigue-free adult handwriting.
Posture and Paper Position
Sit with your feet flat on the floor and your forearm resting on the desk — not floating in the air. Your writing arm should be supported from the elbow down. This lets the large forearm muscles do the work of moving the pen, rather than your fingers and wrist doing everything alone. It's the single biggest change most adults can make for immediate improvement in both quality and stamina.
Tilt your paper slightly — around 15 to 30 degrees to the left if you're right-handed, to the right if you're left-handed. This angle naturally aligns the direction of your strokes with the natural movement of your hand, which reduces strain and produces more even letter slant without conscious effort.
If your fingertips go white or pale while writing, you're gripping too hard. If your hand aches after writing just one or two sentences, you're gripping too hard. If your letters look pressed into the page rather than sitting on it, you're gripping too hard. The solution in all three cases is the same: consciously relax your grip every thirty seconds until the looser hold starts to feel natural — which takes about a week of consistent practice.
Step 3 — Choose the Right Tools
Your tools matter more than you might expect — not because expensive equipment writes for you, but because the wrong tools actively work against you. A scratchy pen that requires pressure produces tense handwriting. Paper that's too smooth gives you no feedback. Paper that's too rough catches the nib unpredictably. Here's what actually works for adult practice.
| Tool | Best Choice | Why | Avoid |
|---|---|---|---|
| Pen (beginner) | 0.5mm gel pen or medium ballpoint | Smooth, consistent line, no pressure needed, gives clear feedback on stroke quality | Felt-tips (too forgiving), dried-out ballpoints (require pressure) |
| Pen (intermediate) | Fountain pen with medium nib | Naturally rewards a light grip, flows smoothly, makes messy technique immediately visible | Very fine nibs until grip is relaxed (scratchy at wrong angle) |
| Paper | Lined notebook, 8–10mm ruling | Gives baseline reference and height guide without being so dominant you rely on it as a crutch | Graph paper (lines too busy), blank paper until intermediate level |
| Notebook | Dedicated practice notebook | Keeping a single practice notebook lets you compare progress over time — one of the most motivating things you can do | Loose sheets (hard to track progress, easy to lose) |
Buy one notebook specifically for practice. Label the first page with today's date and write your current handwriting at full speed. Then date each practice session on the page. Flipping back through it after six weeks is one of the most motivating experiences in handwriting improvement — the contrast is usually dramatic, and you'll have proof that the work is actually paying off.
Step 4 — Start With Stroke Drills, Not Letters
This is where most adult handwriting guides skip something important. They jump straight to practising letters and sentences, missing the step that musicians, athletes, and calligraphers all know is essential: basic movement training before complex movement training.
Every letter in the alphabet is made from a small number of fundamental strokes. If those strokes are clean and consistent, your letters will be clean and consistent. If those strokes are shaky, uneven, or tense, no amount of letter practice will fix the underlying problem.
The 5 Core Stroke Drills — 3–5 Minutes Before Every Session
Spend one line on each drill at the start of every session. That's five lines, maybe three minutes. It's the equivalent of a musician running scales before playing — it prepares the hand and gets the movements precise before you ask them to do something more complex.
Step 5 — Targeted Letter Practice for Your Weak Spots
Go back to your assessment from Step 1. You identified three letters that look worst in your handwriting. This week, you're going to work on those three letters — and nothing else. Not the whole alphabet. Not every letter that could be better. Just three.
This is counterintuitive advice, but it works. Spread your attention across 26 letters and you'll make marginal improvements across the board. Focus it entirely on three letters for a week and you'll make dramatic improvements on those three — improvements that often carry over to similar letters automatically, because letters share stroke elements.
How to Practise a Specific Letter
Before writing the letter, trace the air with your pen, following the stroke sequence: where do you start? Which direction does each stroke go? How many separate strokes does the letter have? Most adults have never thought about this consciously — they just produce the letter somehow and hope for the best.
A full line of just that one letter, slowly. After every five letters, stop and compare. Is each one the same height? Does each one have the same slant? Does each one sit on the baseline? Adjust on the next five based on what you see.
Write it next to the letters it most commonly appears with. If you're working on "a," write: an, at, as, ar, al, ma, ba, la, ca, ha, pa. These combinations train the transitions into and out of the letter — which is where most problems actually occur, not in the isolated letter itself.
Write a sentence where your target letter appears frequently. For "g": "The grey dog galloped through the long grass." Write this sentence five times. By the fifth repetition, your hand should be producing the letter more automatically and more consistently than it was on the first.
Based on the adults we've worked with: g and y (descender loops that close inconsistently), a and d (the enclosed curve that opens or closes at the wrong point), f (crossing placed at the wrong height), k (the diagonal strokes that meet inconsistently), and r (which many adults write as a barely-visible bump). If you're not sure which three to start with, pick from this list.
Step 6 — Sentence Practice That Actually Builds Muscle Memory
Once your grip is under control, your stroke drills are part of your warm-up routine, and you've spent at least a week on your three weakest letters, you're ready for sentence practice — the main event of adult handwriting improvement.
Sentence practice is where the motor memory that determines your everyday handwriting actually gets built. Here's the method that works: take one sentence, write it ten times in a row, slowly enough that you're consciously applying everything you've been working on. Then stop. Review your ten lines. Compare the last to the first. Note what improved. Note what still needs attention. That information guides your next session.
Sentences Designed for Adult Practice
The following sentences are chosen specifically for adults. They're longer than beginner sentences, include a range of letter heights and punctuation, and are meaningful enough that you won't switch off when writing them for the eighth time. Work through them in order over the coming weeks:
On days when you're short on time, write just one sentence ten times. That takes roughly three minutes. It's not enough to make dramatic progress, but it's enough to maintain the motor patterns you've been building and keep the habit alive. Three minutes beats zero every time.
Your 7-Day Weekly Practice Schedule
One of the most common questions from adults starting out is: "What exactly should I do in each session?" Here's a concrete weekly structure that covers all the elements, avoids repetition fatigue, and builds on itself. Each session is 15–20 minutes.
A consistent weekly structure — rather than random, sporadic practice — is what separates adults who see real improvement from those who don't.
The 6 Most Common Mistakes Adults Make When Practising
Knowing what not to do is just as valuable as knowing what to do. These are the six mistakes that most reliably stall adult handwriting improvement — and the fix for each one.
Many adults slow down dramatically the moment they start "practising" — and then write at their normal speed the rest of the time. This trains two different handwriting styles: a neat slow one and a messy fast one. The goal is to make neat handwriting your default speed, not a special mode. Practise at a speed that's slightly slower than your natural pace, but not so slow that it feels artificial.
Trying to fix letter height, spacing, slant, grip, and specific letters all in one session guarantees that you'll fix none of them properly. Your conscious attention is a limited resource. Pick one thing per session — just one — and let the others do what they do naturally. Over several weeks, work through each problem systematically. This is slower to start and dramatically faster overall.
Writing ten lines of a sentence without ever looking back at them is almost useless for improvement. The review is where the learning happens. After every line, glance at it. After every five lines, look at all five side by side. What's getting better? What's not? The brain needs that feedback loop to adjust the motor output. Without it, you're just reinforcing whatever you're already doing.
A common experience: handwriting improves visibly during practice sessions but reverts completely when writing in the real world — filling in a form, jotting a note, signing a card. This happens because the new movement patterns haven't been reinforced enough to become default yet. The fix is to bring deliberate attention to your posture and grip during everyday writing, not just practice sessions. It takes a few weeks for the new patterns to become automatic enough to survive real-world pressure.
Blank paper too early means no baseline reference, which makes everything harder. Lined paper too late means you never develop genuine control independent of the lines. Wide lines for too long means your letters stay large and loose. Adjust your paper as you improve — it's a free and significant upgrade to your practice quality.
The first improvement usually comes relatively quickly — within two or three weeks. Many adults take that as a sign they're done, stop practising regularly, and watch the improvement fade within a month. Real, lasting change — handwriting that stays improved under all conditions — takes at least six to eight weeks of consistent practice. Don't stop when it gets good. Stop when it stays good without effort.
Print vs Cursive — Which Should Adults Focus On?
This is one of the questions I get asked most often, and the honest answer is that for most adults, it doesn't matter as much as they think — but print is the better starting point for the vast majority of people.
The Case for Print First
Print handwriting is clearer, more universally legible, and easier to control. Because each letter is discrete, you can assess and improve them individually. The problems are more visible and therefore more fixable. Most adults who want neater everyday handwriting — for work documents, greeting cards, forms, personal notes — will be completely satisfied with excellent print. There's no rule that says adults need to use cursive, and for many people, forcing cursive creates new problems faster than it solves existing ones.
When Cursive Makes Sense for Adults
If you write at length regularly — journals, long letters, extended note-taking — cursive is worth pursuing, because once it's truly fluent, it is genuinely faster than print. The key word is "fluent." Half-formed cursive, where some letters join and others don't and the connections are inconsistent, is slower and less legible than good print. It's only worth switching to cursive if you're prepared to take it all the way.
The Hybrid Style Most Adults Actually Use
Here's what nobody tells you: most adults with naturally attractive handwriting use a hybrid. Certain letter pairs naturally connect — "ou," "an," "th," "in" — because the pen doesn't need to lift between them. Others are written with a lift. This semi-connected style gives you some of cursive's speed and flow without requiring you to completely relearn how to write. If your current handwriting already partially connects some letters, you're already using a hybrid — and refining that is usually the most practical goal.
| Style | Readability | Speed (when mastered) | Learning Curve for Adults | Best For |
|---|---|---|---|---|
| Highest | Moderate | Low — building on existing skill | Professional documents, forms, everyday notes | |
| Cursive | Variable | Highest | High — significant relearning required | Journals, long letters, extended note-taking |
| Hybrid | High | High | Low-Moderate — natural evolution of print | Most everyday adult writing situations |
What to Expect: A Realistic Progress Timeline
I want to be completely honest with you about what to expect, because unrealistic expectations are one of the main reasons adults give up before seeing real results. Handwriting improvement is not linear. There will be days where your writing looks worse than yesterday's for no obvious reason — this is normal and temporary. It's part of the adjustment process as your hand's default patterns shift.
✅ Key Takeaways — Handwriting Practice for Adults
- Adult handwriting deteriorates from disuse and uncorrected habits — not from any permanent decline in ability. It can be rebuilt.
- Always start with an honest assessment. Identify your top three specific problems before practising anything.
- Fix your grip first — a death grip is the most common root cause of multiple handwriting problems simultaneously.
- Stroke drills before letters, letters before sentences. Don't skip the foundation because it feels too basic.
- 15–20 focused minutes daily consistently outperforms longer occasional sessions. Regularity is the key variable.
- Review your work after every session. The feedback loop is where the actual learning happens.
- Expect visible improvement in 2–3 weeks, significant improvement in 6–8 weeks, and lasting change in 3–6 months.
✍️ Start Practising on Handwriting Repeater Today →